Github Repository
Reply

Make directory called voss in /opt/stackstorm/packs…
mkdir voss
Change location to voss folder…
cd voss
Copy the following files to the folder: icon.png (Extreme Networks logo); pack.yaml; config.schema.yaml
Create sub-folder actions and copy the following files there: cmd.yaml; cmd.py (Python script)
Copy voss.yaml file to /opt/stackstorm/configs folder.
Note: Take care with indentation, whitespace characters and syntax when creating script and yaml files to avoid wasting time troubleshooting when installing packs.
Installing new voss pack…
git init && git add ./* && git commit -m “Initial commit”
st2 pack install file:///$PWD
Note: If something fails worth checking the file attributes allow access. Add permissions with sudo chmod 777 . -R.
Note: Can remove .git folder with sudo rm -r .git if need to rebuild by doing another git.
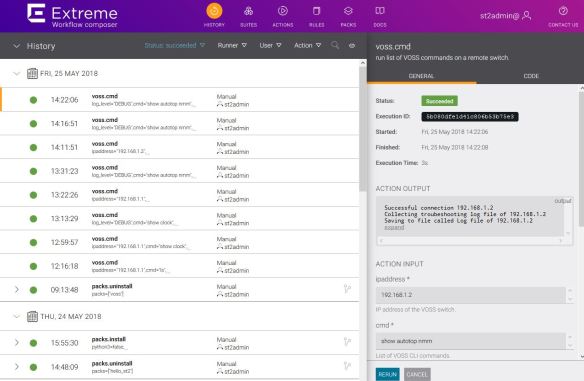
Execute Action (voss.cmd) which allows you to enter IP address of the switch and the command to use. For example, enter IP 192.168.1.2 (core switch 2) and pass command show autotop nmm will initiate SSH connection run the command and save the output to a file before closing the SSH session.
cat ‘Log file of 192.168.1.2’
Using security software from Mocana Corporation. Please visit https://www.mocana.com/ for more information
Copyright(c) 2010-2018 Extreme Networks.
All Rights Reserved.
VSP Simulator: Virtual Services Platform 8200
VSP Operating System Software Build 7.0.0.0_B885
Unsupported Software, Internal Use Only
This product is protected by one or more US patents listed at http://www.extremenetworks.com/patents along with their foreign counterparts.
EXTREME NETWORKS VOSS COMMAND LINE INTERFACE
core2:1>show autotop nmm
==========================================================================================
Topology Table
==========================================================================================
Local Rem
Port IpAddress SegmentId MacAddress ChassisType BT LS CS Port
——————————————————————————————
0/0 192.168.1.2 0x000000 005100f92800 VSP8284XSQ 12 Yes HtBt 0/0
1/1 10.0.0.43 0x000101 005100eb2800 VSP8284XSQ 12 Yes HtBt 1/1
1/1 192.168.1.5 0x000107 703018a4e101 ERS3510GT 12 Yes HtBt 1/7
1/8 10.0.0.43 0x000108 005100eb2807 VSP8284XSQ 12 Yes HtBt 1/8
*******************************
Pack
pack.yaml
—
ref: voss
name: VOSS
description: Actions for managing Extreme Networks EXOS devices
keywords:
– voss
version: 0.0.2
author: Extreme Networks
email: support@extremenetworks.com
config.schema.yaml
—
username:
description: “Login username”
type: “string”
required: true
default: “rwa”
password:
description: “Login password”
type: “string”
required: true
default: “rwa”
Actions
cmd.yaml
—
name: “cmd”
runner_type: “python-script”
description: “run list of VOSS commands on a remote switch.”
enabled: true
entry_point: “cmd.py”
parameters:
ipaddress:
type: “string”
description: “IP address of the VOSS switch.”
required: true
position: 0
cmd:
type: “string”
description: “List of VOSS CLI commands.”
required: true
position: 1
cmd.py
from st2common.runners.base_action import Action
import paramiko
class VOSSCmd(Action):
def run(self, ipaddress=’192.168.1.1′, cmd=”):
“””
Run a VOSS command on the remote switch
Args:
– ipaddress: The IP address of the switch
– username: login user name
– password: login password
– cmd: either a single EXOS command or list of VOSS commands
Raises:
– ValueError: On switch reponse being invalid
– RuntimeError: if switch cannot process the command
Returns:
dict: with VOSS CLI results
“””
username=’rwa’
password=’rwa’
ssh_client = paramiko.SSHClient()
ssh_client.set_missing_host_key_policy(paramiko.AutoAddPolicy())
ssh_client.connect(hostname=ipaddress,username=username,password=password)
print ‘Successful connection’, ipaddress
remote_connection = ssh_client.invoke_shell()
print ‘Collecting troubeshooting log file of ‘ + ipaddress
remote_connection.send(cmd)
remote_connection.send(‘\n’)
readoutput = remote_connection.recv(655350)
saveoutput = open(‘Log file of ‘ + ipaddress, ‘w’)
print ‘Saving to file called Log file of ‘ + ipaddress + ‘\n’
saveoutput.write(readoutput)
saveoutput.write(‘\n’)
saveoutput.close
ssh_client.close()
Configs
voss.yaml
—
username: “rwa”
password: “rwa”
Note: If pack or config files change rerun one of the following:
st2ctl reload –register-actions
st2ctl reload –register-configs
Note: Locate the output file with following command syntax…
find / -name ‘Log file of 192.168.1.1’ 2>/dev/null
![]()
(icon.png)
https://github.com/StackStorm/st2/tree/master/contrib/hello_st2
https://docs.stackstorm.com/reference/packs.html
Create the pack folder structure and related files. Let’s keep the metadata files such as pack.yaml, config.schema.yaml, and requirements.txt empty for now:
# Use the name of the pack for the folder name.
mkdir hello_st2
cd hello_st2
mkdir actions
mkdir rules
mkdir sensors
mkdir aliases
mkdir policies
touch pack.yaml
touch requirements.txt
Note: All folders are optional. It is safe to skip a folder or keep it empty. Only create the config.schema.yaml file if it is required. An empty schema file is not valid.
Create the pack definition file, pack.yaml:
sudo chmod 777 pack.yaml
—
ref: hello_st2
name: Hello StackStorm
description: Simple pack containing examples of sensor, rule, and action.
keywords:
– example
– test
version: 0.1.0
author: StackStorm, Inc.
email: info@stackstorm.com
Create the action. An action consists of meta data, and entrypoint. The following example simply echoes a greeting.
Copy the following content to actions/greet.yaml:
—
name: greet
pack: hello_st2
runner_type: “local-shell-cmd”
description: Greet StackStorm!
enabled: true
entry_point: greet.sh
parameters:
greeting:
type: string
description: Greeting you want to say to StackStorm (i.e. Hello, Hi, Yo, etc.)
required: true
position: 1
Copy the following content to actions/greet.sh:
#!/bin/bash
echo “$1, StackStorm!”
Create a sensor. The sample sensor below publishes an event to StackStorm every 60 seconds.
Copy the following content to sensors/sensor1.yaml:
—
class_name: “HelloSensor”
entry_point: “sensor1.py”
description: “Test sensor that emits triggers.”
trigger_types:
–
name: “event1”
description: “An example trigger.”
payload_schema:
type: “object”
Copy the following content to sensors/sensor1.py:
import eventlet
from st2reactor.sensor.base import Sensor
class HelloSensor(Sensor):
def __init__(self, sensor_service, config):
super(HelloSensor, self).__init__(sensor_service=sensor_service, config=config)
self._logger = self.sensor_service.get_logger(name=self.__class__.__name__)
self._stop = False
def setup(self):
pass
def run(self):
while not self._stop:
self._logger.debug(‘HelloSensor dispatching trigger…’)
count = self.sensor_service.get_value(‘hello_st2.count’) or 0
payload = {‘greeting’: ‘Yo, StackStorm!’, ‘count’: int(count) + 1}
self.sensor_service.dispatch(trigger=‘hello_st2.event1’, payload=payload)
self.sensor_service.set_value(‘hello_st2.count’, payload[‘count’])
eventlet.sleep(60)
def cleanup(self):
self._stop = True
# Methods required for programmable sensors.
def add_trigger(self, trigger):
pass
def update_trigger(self, trigger):
pass
def remove_trigger(self, trigger):
pass
Create a rule. The sample rule below is triggered by an event from the sensor and invokes the action from the samples above.
Copy the following content to rules/rule1.yaml:
—
name: on_hello_event1
pack: hello_st2
description: Sample rule firing on hello_st2.event1.
enabled: true
trigger:
type: hello_st2.event1
action:
ref: hello_st2.greet
parameters:
greeting: Yo
Create an action alias. The sample action alias below aliases the greet action and makes it accessible from ChatOps.
Copy the following content to aliases/alias1.yaml:
—
name: greet
pack: hello_st2
description: “Greet StackStorm”
action_ref: “hello_st2.greet”
formats:
– “greet {{greeting}}”
Create a policy. The sample policy below limits concurrent operation of the greet action.
Copy the following content to policies/policy1.yaml:
—
name: greet.concurrency
pack: hello_st2
description: Limits the concurrent executions of the greet action.
enabled: true
resource_ref: hello_st2.greet
policy_type: action.concurrency
parameters:
threshold: 10
Install the pack. We encourage using git. If you do so, st2 pack will greatly simplify your pack management. Of course, you can define your own tools and workflow for editing and versioning packs. You’ll need to place the files in /opt/stackstorm/packs and [re-]load the content.
Use git and pack install (recommended):
# Get the code under git
cd hello_st2
git init && git add ./* && git commit -m “Initial commit”
# Install from local git repo
st2 pack install file:///$PWD
Initialised empty Git repository in /opt/stackstorm/packs/hello_st2/.git/
*** Please tell me who you are.
Run
git config –global user.email “you@example.com”
git config –global user.name “Your Name”
to set your account’s default identity.
Omit –global to set the identity only in this repository.
st2 execution list
# contents of a pack folder
actions/ #
rules/ #
sensors/ #
aliases/ #
policies/ #
tests/ #
etc/ # any additional things (e.g code generators, scripts…)
config.schema.yaml # configuration schema
packname.yaml.example # example of config, used in CI
pack.yaml # pack definition file
requirements.txt # requirements for Python packs
requirements-tests.txt # requirements for python tests
icon.png # 64×64 .png icon
At the topmost level are the main folders actions, rules, sensors, aliases and policies, as well as some shared files:
pack.yaml – Metadata file that describes and identifies the folder as a pack.config.schema.yaml – Schema that defines configuration elements used by a pack.requirements.txt – File containing a list of Python dependencies. If your pack uses Python actions and/or sensors, you can specify any Python libraries you need here. They will automatically be installed in a pack-specific virtualenv when you install the pack.Configuration Schema
The configuration schema is a YAML formatted file which defines the schema for that pack’s configuration file. This schema is written by the pack author and contains information about every available configuration item (name, type, is value a secret, etc). The file is named config.schema.yaml and is located in the root of the pack directory (/opt/stackstorm/packs/<mypack>/).
/opt/stackstorm/packs/exos
config.schema.yaml
—
username:
description: “Login username”
type: “string”
required: true
default: “admin”
password:
description: “Login password”
type: “string”
required: true
default: “”
pack.yaml
—
ref: exos
name: EXOS
description: Actions for managing Extreme Networks EXOS devices
keywords:
– exos
– extreme
– networking
version: 0.0.2
author: Extreme Networks
email: support@extremenetworks.com
Configuration File
The configuration file is a YAML formatted file which contains site-specific configuration values. This file can contain ‘static’ or ‘dynamic’ values. The configuration file is named <pack name>.yaml and located in the /opt/stackstorm/configs/ directory. File ownership should be st2:st2.
For example, for a pack named libcloud, the configuration file is located at /opt/stackstorm/configs/libcloud.yaml.
/opt/stackstorm/packs/exos
exos.yaml.example
—
username: “admin”
password: “SuperSecret”
/opt/stackstorm/configs
exos.yaml
username: admin
Note : When modifying the configuration in /opt/stackstorm/configs/ please remember to tell StackStorm to load these new values by running st2ctl reload --register-configs
Actions
# contents of actions/
actions/
lib/
action1.yaml
action1.py
action2.yaml
action1.sh
workflow1.yaml
workflow2.yaml
workflows/
workflow1.yaml
workflow2.yaml
cmd.yaml
—
name: “cmd”
runner_type: “python-script”
description: “run list of EXOS commands on a remote switch.”
enabled: true
entry_point: “cmd.py”
parameters:
ipaddress:
type: “string”
description: “IP address of the EXOS switch.”
required: true
position: 0
cmd:
type: “string”
description: “List of EXOS CLI commands.”
required: true
position: 1
cmd.py
import sys
from lib.jsonrpc import JsonRPC
from st2common.runners.base_action import Action
class ExosCmd(Action):
def run(self, ipaddress=’10.68.65.81′, cmd=”):
“””
Run an EXOS command on the remote switch
Args:
– ip_address: The IP address of the switch
– username: login user name
– password: login password
– cmd: either a single EXOS command or list of EXOS commands
Raises:
– ValueError: On switch reponse being invalid
– RuntimeError: if switch cannot process the command
Returns:
dict: with EXOS CLI results
“””
jsonrpc = JsonRPC(ipaddress, self.config[‘username’], self.config[‘password’])
jsonrpc.cookie = self.action_service.get_value(‘cookie’)
try:
response = jsonrpc.send(cmd)
self.action_service.set_value(name=’cookie’, value=jsonrpc.cookie)
return response
except Exception:
sys.exit(1)
The actions folder contains action script files and action metadata files. See Actions and Workflows for specifics on writing actions. Since metadata files and workflow definitions can both be written as YAML, it’s good practice to put the workflow definitions in a separate directory. Note that the lib sub-folder is often used for storing common Python code used by pack actions.
ls lib
__init__.py __init__.pyc jsonrpc.py jsonrpc.pyc
https://docs.stackstorm.com/reference/packs.html
