How to do EAP-TLS with Control

Using certificates is more secure than just using the username and password for authentication.

EAP-TLS.PNG

What is needed for Certificate:

Private key generated by CLI or Browser.

CSR generated by CLI or Browser.

CA will generate the certificate based on CSR through CLI or Browser.

Cert.PNG

privatekey.PNG

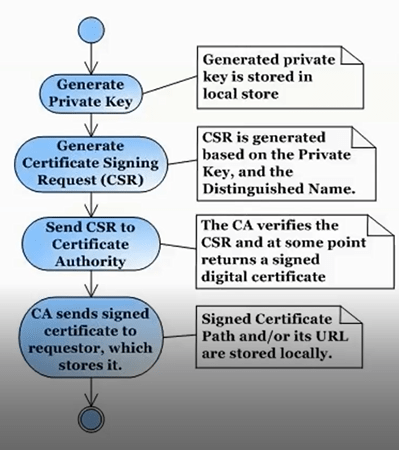
Generate a Server Private Key

Use the following steps to generate an encrypted RSA private key.

1.Enter the following command to use OpenSSL to generate a password-encrypted PKCS #8 formatted server private key file. Use the key size and output file name you prefer. (If you are unsure of the key size, use 2048.)

openssl genrsa <key size> | openssl pkcs8 -topk8 -out <output file>

For example:

openssl genrsa 2048 | openssl pkcs8 -topk8 -out server.key

2.You will be prompted for an Encryption Password. Be sure to make a note of the password that you enter. If the password is lost, you will need to generate a new server private key and a new server certificate.

keyexample.PNG

csr.PNG

CN should use the FQDN of the ACE.

Create a Certificate Signing Request

Use the following steps to create a Certificate Signing Request (CSR).

1.Enter the following command to generate a CSR file. Use the output file name you used in step 1 above as the input file, and specify the output file name you prefer:

openssl req -new -key <input file> -out <output file>

For example:

openssl req -new -key server.key -out server.csr

2.You will be prompted for information that will appear in the certificate. When you are prompted for a Common Name, specify the fully qualified host name of the NAC appliance. For example:

Common Name (eg, YOUR name) []:nac1.mycompany.com

If you are creating a client and/or server certificate CSR request for use with PEAP or EAP-TLS, you may need to add an extension to the command used to generate the CSR file. Server and client certificates require an extension in order to operate as intended. Verify with your certificate vendor whether they require that the extensions are part of the CSR or are included in the certificate when the request is made. The following are command examples of the CSR request that include each of the extension options available.

•If the CSR is for the NAC appliance, the command must include:
openssl req -new -reqexts server_auth -key <input file> -out <output file>
•If the CSR is for a client, the command must include:
openssl req -new -reqexts client_auth -key <input file> -out <output file>
•If the CSR is for both the NAC appliance and client, the command must include:
openssl req -new -reqexts server_and_client_auth -key <input file> -out <output file>

csrexample.PNG

Verify CSR by openSSL:

openssl req -text -noout -verify -in <csrfile.csr>

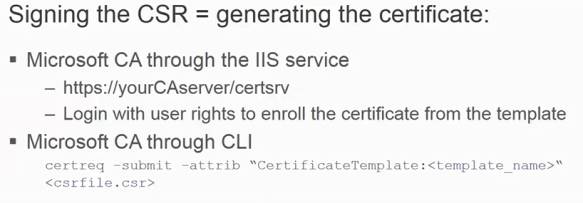
Submit the Request to a Certificate Authority

The procedure for submitting a CSR to a Certificate Authority (CA) varies with the service used. Usually, it is done through a website using a commercial service such as VeriSign. You can also use an in-house CA, which generates certificates used internally by your enterprise. You will provide information including the contents of the CSR, and receive back one or more files containing the server certificate and possibly other certificates to be used in a chain.

signcsr.PNG

requestcert.PNG

advcertreq

submitcertreq.PNG

csr+template.PNG

downloadcert

mangecert.PNG

updateradiuscert.PNG

key+cert

key+cert+pwd

trustedca.PNG

updateaaatrustedcert

Install certificate to client computer by GPO which is transparent for users. There should be a user certificate (in Certificates – Current User : Personal>Certificates) and a CA certificate installed (in Trusted Root Certificate Authorities) on the client.

Note: Some browsers may prevent you from seeing and choosing different settings such as key length when asking for the User certificate. Verify the certificate is installed using run mmc and add certificates snap-in. Also open the installed certificate and look at the details to gather more detail.


Certificate Configuration (XMC)

During installation, Access Control generates a unique private key and server
certificate for the NAC Manager RADIUS server. This certificate provides basic
functionality while you are configuring and testing your NAC Manager
deployment. To integrate with the certificate structure you already have on your
network, update to a certificate generated by a Certificate Authority that your
connecting end-systems are already configured to trust.

Update RADIUS Server Certificate Window

The RADIUS server certificate is the certificate sent to end-systems during
certain forms of 802.1X authentication. If the appliance RADIUS server will proxy
all 802.1X authentication requests, then certificates are not used. If the appliance
RADIUS server can terminate 802.1X authentication requests, then certificates
will be used if you are using EAP-TLS, PEAP, or EAP-TTLS authentication. The
Update RADIUS Server Certificate window in NAC Manager lets you replace the
server certificate.

Refer to hep topic How to Update Access Control Engine Server Certificates in Extreme Management Center (Legacy) in the EMC NAC Manager User Guide.

In addition, to configure the AAA Trusted Certificate Authorities to designate
which client certificates can be trusted see the Update AAA Trusted Certificate Authorities Window help topic.

LDAP Authentication (XMC)

LDAP authentication uses a backend Active Directory server or LDAP server
defined in your AAA Configuration to authenticate users. Additionally, some
protocols also require RADIUS server and client certificates to be used in
conjunction with LDAP authentication.

Active Directory

Supported Protocols: PAP, MsCHAP, PEAP, EAP-MsCHAPV2, and EAP-TTLS
with tunneled PAP.

PAP or EAP-TTLS with tunneled PAP protocols

During the authentication process, the Access Control engine sends an LDAP
bind request to the Active Directory domain controller using the password
retrieved from the end user’s authentication request. Therefore, the LDAP
protocol must be allowed between the Access Control engine and the Active
Directory domain controller for the authentication process to take place.

MsCHAP, PEAP, and EAP-MsCHAPv2 protocols

These three protocols work with Active Directory (and not other LDAP servers)
because they use NT Hash for password encryption, which is the same
password hash type used by the Microsoft Active Directory domain controller.

Local Authentication

Local authentication uses a local password repository defined in your AAA
Configuration to authenticate users. Additionally, some protocols also require
RADIUS server and client certificates to be used in conjunction with local
authentication.

When you add or edit a user in your local password repository, you can specify
the password hash type used to encrypt the user’s password in the Extreme
Management Center and NAC Manager databases.


Local RADIUS Termination at the Access Control Engine

How to configure authentication using the Access Control engine RADIUS server to locally terminate 802.1X EAP authentication requests. There are three methods that can be used to do this, depending on the protocol that is used:

  • LDAP Authentication – Uses a backend Active Directory server or LDAP server, and
    RADIUS server and client certificates (if required) to authenticate users.
  • Local Authentication – Uses a local password repository, and RADIUS server and
    client certificates (if required) to authenticate users.
  • RADIUS Certificates only – Uses only RADIUS server and client certificates to
    authenticate users (no password is required).

The chart below lists the hash types supported by each protocol for user password
encryption. Note that PEAP (TLS) is not supported for local RADIUS termination
and is only supported in a proxy RADIUS configuration. If passwords are required, you can then decide whether to use LDAP or local authentication for password verification.

8021xeap


Testing Bandwidth

Use iperf3.exe to test bandwidth between a client and server by using iperf3 on the command line.

On the server…

iperf3 -s

On the client…

iperf3 -c <host>

Tip: Within File Explorer press shift and right click mouse allows you to open a command line from the directory the executable is in.


GNS3 Windows Appliance

The GNS3 appliance template file may not match the filename downloaded and will complain about the MD5 checksum not matching. Make a note of the MD5 checksum for the new filename as you will need this when you edit the appliance .GNS3a file.

For example, the downloadable filename for Windows 7 with IE11 changed from “IE11_-_Win7-disk1.vmdk” to “IE11-Win7-VMWare-disk1.vmdk”.

Find the places where the old filename are mentioned and change the filename to the new filename and alter the md5sum, and no need to alter the filesize.

Before

{
“filename”: “IE11_-_Win7-disk1.vmdk”,
“version”: “7 w/ IE11”,
“md5sum”: “5733cc93a6ed756c2358f0a383b411a8”,
“filesize”: 4101495296,
“download_url”: https://developer.microsoft.com/en-us/microsoft-edge/tools/vms/

},

{
“name”: “7 w/ IE11”,
“images”: {
“hda_disk_image”: “IE11_-_Win7-disk1.vmdk”
}
},

After

{
“filename”: “IE11-Win7-VMWare-disk1.vmdk”,
“version”: “7 w/ IE11”,
“md5sum”: “d682fde5fc4d8fd4374fdeca70fd2011”,
“filesize”: 4101495296,
“download_url”: https://developer.microsoft.com/en-us/microsoft-edge/tools/vms/

},

{
“name”: “7 w/ IE11”,
“images”: {
“hda_disk_image”: “IE11-Win7-VMWare-disk1.vmdk”
}
},

VSP Flight-recorder

voss01:1#flight-recorder ?
Perform actions on flight-recorder data
all       Create flight-recorder snapshot, trace, and archive
archive   Create tarball of flight-recorder files, log file, config file, etc.
snapshot  Take snapshot of flight-recorder PMEM data
trace     Take snapshot of always-on-trace data
voss01:1#flight-recorder all ?
{slot[-slot][,…]}  Slot – Valid slot is 1

Example…

flight-recorder all 1

Processing Flight-recorder snapshot for 1 ….

Flight-recorder snapshot for slot 1 complete, filename is /intflash/PMEM/1/pmem.20190311115209.1.tar.gz.

Processing Flight-recorder trace for 1 ….

Flight Recorder trace taken for namServer on slot 1. File: /intflash/flrec/1/trace.20190311115210.namServer-1.txt
Flight Recorder trace taken for cbcp-main.x on slot 1. File: /intflash/flrec/1/trace.20190311115210.cbcp-main.x-1.txt
Flight Recorder trace taken for ssio on slot 1. File: /intflash/flrec/1/trace.20190311115211.ssio-1.txt
Flight Recorder trace taken for logServer on slot 1. File: /intflash/flrec/1/trace.20190311115211.logServer-1.txt
Processing Flight-recorder archive for slot 1 ….

NOTE: Deleting Flight-recorder trace files (if any) from /intflash/flrec/1/ and adding them to the archive
NOTE: Deleting Flight-recorder snapshot files (if any) from /intflash/PMEM/1/ and adding them to the archive

Flight-recorder archive for slot 1 complete, filename is /intflash/archive/1/archive.20190311115212.1.tar

XMC Upgrade

Use the Appliance Upgrade files to update your XMC appliances such as EMC, NAC and Analytics.

SCP to the IP address of the appliance and transfer the upgrade .bin file to a location on the server.

Make the .bin executable using chmod 755 <bin file>.

Run the bin file

./<bin file>

Note:

You will need internet access to complete the upgrade so that Ubuntu packages can be updated.

Check release of Ubuntu by typing command lsb_release -a

Edit /etc/network/interfaces file with nano and add dns-nameservers <DNS server> if not present. The EMC and Analytics allow DNS entries in the interfaces file but NAC uses resolvconf package.

^O Write/Save

^X Exit

On NAC have to use the resolveconf package to setup DNS. Edit /etc/resolvconf/resolv.conf.d/base and enter nameserver <DNS server>.

Sudo resolvconf -u

Bounce the eth0 interface with… sudo ifdown eth0 && sudo ifup eth0

If necessary edit the default route…

ip route del default

ip route add default via <default GW>


Base Unit Select

ERS 4900, ERS 5900

Base Unit Select switch – used to designate the base unit in a stack. When set DOWN, this unit acts as the Base Unit for the stack. Only one switch in the stack must have the Base Unit Select in base position.

ERS 3500, ERS 3600, ERS 4800

Base Unit Select Switch – used to designate the Base Unit in a stack. When set to the RIGHT position, this unit acts as the Base Unit for the stack.